Dead Rodent Removal Scranton PA
A dead mouse or rat in a wall, attic, or crawl space can make a room unusable for weeks. We locate it, remove it through the least-invasive access available, clean and deodorize the area so the smell is handled at its source, and check how it got in. Call for today’s availability.
- Inspection-first
- Exclusion-first
- Photo-documented
- Pet- and child-conscious process
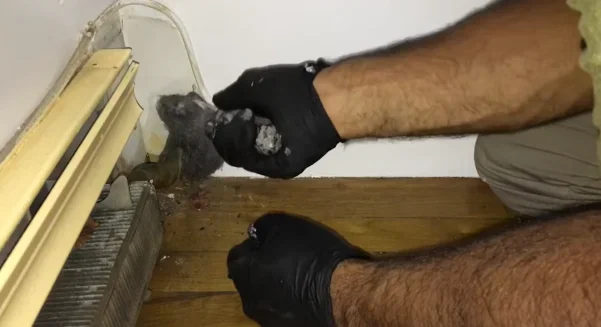
A dead rodent announces itself slowly. First a faint, sweet-sour smell in one room, easy to blame on a drain or the trash. Then it strengthens, peaks in the warmest part of the day, and settles into the wall so the room is hard to use. In Scranton’s older housing — balloon-frame walls that run unbroken from basement to attic, plaster-and-lath partitions, doubles and row homes with shared voids — a mouse or rat that dies inside rarely dies somewhere convenient. It dies where it traveled: a wall cavity, an attic corner, a crawl space, a duct run.
Animals end up dead in voids for a few predictable reasons. Poison lets them wander away from the bait before dying, often into a wall. Sealing done before the animals are out can trap them inside. Traps that go unchecked leave carcasses where they were caught. And in winter, rodents that moved in for warmth simply die in the runs they used every night. Still deciding what you are dealing with? Our guide to a dead animal in the wall walks through the signs and the options first — this page is about having it located and taken out.
Finding it is the real job. You smell a dead rodent where air moves — through outlets, baseboards, and ceiling fixtures — not always where it lies. Cutting into the wrong wall section costs a repair and does not solve anything. A removal visit works the other way: narrow the location down first, use the least-invasive access that reaches it, and open a wall only when nothing else will.
How Locating a Dead Rodent Works
Locating starts with the odor pattern. Where is the smell strongest — one wall, one corner, one ceiling? When does it peak: with morning heat, when the furnace runs, all day? Odor that moves with the heating cycle usually points to a void connected to ductwork or a pipe chase. Odor fixed to one wall section, strongest low or high, points to that cavity. The history matters just as much. Scratching that stopped suddenly, traps set in the past two weeks, bait placed by a previous provider, or sealing done recently all tell us when the animal died and which runs it was using.
The inspection follows the travel routes. The attic is checked first — top plates, soffit corners, and nesting areas above the room where the smell is strongest. Then the crawl space or basement ceiling below it, pipe chases, and the wall voids that connect them. Droppings, rub marks, and nesting material along a run show where the animal traveled, and an inspection camera can be used through an existing gap where access allows. The goal is to narrow the carcass to a small, named area — this wall section, that attic corner — before anything is opened, and to photograph what is found.
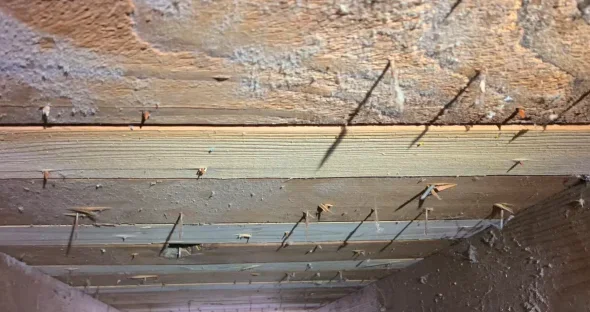
Access and Removal: Least-Invasive First
Most dead rodents are removed without cutting anything. The usual routes, in order:
- Attic access — carcasses in attic insulation, soffit corners, and wall top plates reached from above.
- Crawl space or basement ceiling — animals that dropped into a wall void can often be reached from below.
- Existing openings — utility penetrations, access panels, and removable fixtures that open onto the void.
When a wall opening is the only route, we say so plainly before any cutting. The opening is made at the located point, kept as small as the removal allows, and agreed with you in the written plan first — including how the opening will be closed and whether finish work such as paint is part of the job or a separate step for a painter or handyman. No wall is opened on a guess.
Handling follows safe practice throughout. The crew wears gloves and protective equipment, wets the carcass and the immediate area with disinfectant before moving it, and bags and seals it for disposal. That wet-clean method follows the CDC guidance on cleaning up after rodents: do not sweep or vacuum droppings or nesting material, because dry disturbance stirs contaminated dust into the air. The immediate area is also checked for a second animal, droppings, and nesting, since a carcass is often not the only thing in the void. This is general information, not medical advice; if you have health concerns about exposure, talk to your clinician.
Deodorizing and Sanitation After Removal
Odor treatment only works once the source is out. Sprays, ozone machines, and scented products used while the carcass is still in the wall mask the smell for a day and then lose. After removal, the reachable surfaces in the void are cleaned, soiled insulation or nesting material in the immediate area is taken out and bagged, and the area is treated with a disinfectant or odor treatment suited to the surface. If contamination is widespread — a whole attic of soiled insulation, for example — that is a larger cleanup, and our attic rodent cleanup service covers it.
Set honest expectations for the days after. A strong odor usually drops sharply once the carcass and soiled material are out, then fades over the following days as the void dries and the home is ventilated. A faint residual smell in hot weather is normal for a short period. What is not normal is an odor that stays at full strength — that usually means a second carcass or a missed location, and it is a reason to recheck the voids rather than to buy another deodorizing product. Flies that gathered around the area also decline once the source is gone and the area is cleaned.
Why It Got In: The Entry-Point Check
A dead rodent inside the structure means the structure was open to it. It either lived in the building or found a way in, and the same gap that let it in is still there for the next one. Every removal visit includes a check of the likely entry points: foundation gaps and cracks, the sill line, roofline and soffit gaps, vent openings, and the penetrations where pipes, cables, and AC lines pass through the walls.
The check also looks for signs that other rodents are still active — fresh droppings, new gnawing, sounds reported at night. If they are, removal of the carcass is only the first step, and the sequence becomes the standard one: trapping and removal of the animals inside, then rodent exclusion to seal the entry points once the building is clear. What is found, and what sealing is recommended, goes into the written plan so you can decide with the full picture.
What Affects How Hard the Job Is
Location. A carcass in open attic insulation is straightforward. One deep in a finished wall, behind tile, or inside a duct run takes more locating and more careful access. Access. Attics and crawl spaces with real entry points make removal simpler; sealed ceilings and finished basements narrow the routes in. How long it has been there. A recent death is a smaller job than one found weeks later, when odor has spread and the carcass has drawn flies. Size and number. A rat is a bigger removal than a mouse, and more than one animal in the same void system is common when poison was used. Contamination. Soiled insulation or nesting around the carcass adds cleanup time.
The final quote follows the locating inspection, when the location and access route are known. For the cost drivers and the national ranges we use as a reference, see the Rodent Control Cost Guide.
Our Step-by-Step Process
- Inspect and locate
We map the odor pattern, review the activity history, and inspect the attic, crawl space, and wall voids until the carcass is narrowed to a specific area, with photos. - Plan
You get a written plan and quote covering the access route, the removal, the sanitation, and any opening that may be needed — agreed before work begins. - Access
We reach the carcass by the least-invasive route available: attic, crawl space, existing opening, or — only when necessary — a small wall opening at the located point. - Remove
The carcass is disinfected, removed with gloves and protective equipment, bagged and sealed, and taken out for disposal. The immediate area is checked for a second animal. - Sanitize and deodorize
Reachable void surfaces are cleaned, soiled material in the immediate area is removed, and an odor treatment is applied where the carcass lay. - Report and seal check
You get photos and a written summary, the entry-point findings, and the sealing or follow-up work recommended so it does not happen again.
See how the 6-step process works across all of our services.
What’s Included — and What’s Not
Included
- Locating inspection of the attic, crawl space, and wall voids, with photo documentation
- Removal of the dead rodent through the least-invasive access available
- Bagging, sealing, and disposal of the carcass
- Cleaning and odor treatment of the immediate area
- Entry-point findings with a sealing recommendation
Not Included
- Trapping and removal of live rodents (a separate service, done on its own visit plan)
- Full attic cleanup where contamination is widespread (see attic rodent cleanup)
- Drywall finishing or painting beyond the closing agreed in the written plan
- Replacement of insulation removed from the immediate area
Guides: Dead Animal in the Wall — Who to Call and Rodent Health Risks.
Frequently Asked Questions
For pricing, cost drivers, and national ranges, see the Rodent Control Cost Guide →
How do you find where the dead rodent is?
By the pattern, not by guessing. We map where the odor is strongest and when it peaks, review recent activity and any trapping or baiting history, and inspect the attic, crawl space, and wall voids that line up with the smell. Most locations narrow to a small area before anything is opened.
Will you have to open the wall to remove it?
Only when there is no other route. Most removals are done through existing access — the attic, a crawl space, a basement ceiling, or a utility opening. If a small wall opening is the only way in, that is agreed with you in the written plan before any cutting, and the opening is kept as small as the job allows.
How long will the smell last if the rodent is not removed?
It depends on the size of the animal, the temperature, and ventilation. A mouse odor can fade over days to a couple of weeks as the carcass dries; a rat can take longer, and warmth makes it worse. While it lasts, the carcass can also draw flies and stain the void, and the entry point it used stays open.
Do you find and seal the entry point it used?
The visit includes checking the likely entry points — foundation gaps, rooflines, vents, and utility lines — and reporting what is found. Sealing is done once any animals inside are accounted for, and it is listed in the written plan so you know exactly what is covered.
Related Services
- Rat Removal Scranton PA
- Mice Removal Scranton PA
- Rodent Exclusion Scranton PA
- Attic Rodent Cleanup Scranton PA
Not Sure Where to Start? Call for Today’s Availability
Call (570) 397-9148 or request an inspection. A photo-documented inspection, a written plan, and a quote before any work begins come with every job.